 |
 |
|
|
|
 |
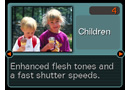 Simply
follow the guidance that appears on the monitor
screen to select the BEST SHOT scene that resembles
the type of image you want to record, and the required
camera settings are configured automatically. You
can even save your own BEST SHOT Mode setups for
instant recall whenever you need them. Simply
follow the guidance that appears on the monitor
screen to select the BEST SHOT scene that resembles
the type of image you want to record, and the required
camera settings are configured automatically. You
can even save your own BEST SHOT Mode setups for
instant recall whenever you need them. |
|
 |
|
 |
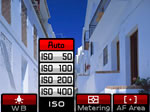
| The EX button is a shortcut key for configuring
recording parameters. A press of the EX button displays
an EX Menu, which provides instant access to settings
that are most commonly used for recording images, arranged
in four groups: white balance, ISO sensitivity, metering,
and AF area. |
|
|
|
|
|
|
|
 |
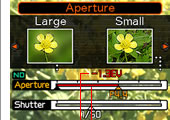
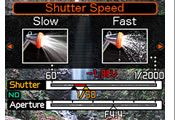
| Manual Assist makes it easy to achieve the
proper balance between aperture and shutter speed when
adjusting exposure manually. Displaying the Manual Assist
screen shows the relationship between aperture and shutter
speed relationship, how much exposure is off, and other
information to help you obtain correct exposure of your
images. |
|
|
|
|
|
 |
| A turn of the mode dial selects either aperture
priority (A), shutter speed priority (S), or manual exposure. |
|
 |
 When
recording, you can select from among three different Auto
Focus area settings: spot (single focus area in the center
of the monitor screen), multi (seven focus areas), or free
(focus area can be located anywhere on the monitor screen).
The AF area can be selected quickly and easily using the
EX button. When
recording, you can select from among three different Auto
Focus area settings: spot (single focus area in the center
of the monitor screen), multi (seven focus areas), or free
(focus area can be located anywhere on the monitor screen).
The AF area can be selected quickly and easily using the
EX button. |
|
 |
 The
macro mode lets you move in close to capture every nuance
of people, food, pets, flowers and other subjects. This
opens up a whole new world of expression to the creative
photographer. The
macro mode lets you move in close to capture every nuance
of people, food, pets, flowers and other subjects. This
opens up a whole new world of expression to the creative
photographer. |
|
 |
| The camera automatically switches to the appropriate
focus mode when the shutter button is pressed. If the camera
detects that the subject is in the range of 1 cm to 50
cm while the normal Auto Focus Mode is selected, it will
automatically switch to the Macro Mode. This helps to ensure
that images are always in focus, even if you forget to
select the proper focus mode. |
|
 |
 |
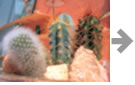
| Previous model normal mode
produces an out of focus image when the subject is
too close. |
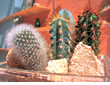
Recording with Auto Macro automatically
switches to the Macro Mode to keep the image in focus. |
|
|
 |
| After recording an image, you can add audio
up to 30 seconds long. You can even re-record the audio
when required. |
|
 |
| The slideshow feature automatically scrolls
through images stored in camera memory at a fixed interval.
You can specify snapshots only or movies only, if you want.
When the slideshow gets to a movie or audio snapshot image,
it automatically plays the audio included with the image. |
|
 |
| The built-in ND filter of this camera reduces
light by 2.0 Exposure Values (EV). Using the ND filter
in the A (aperture priority AE) mode while shooting under
bright lighting will cause the aperture to open wider and
blur the background of the image. |
|
 |
| This CASIO original image processing function
makes it possible for the camera to correct brightness
automatically when recording subjects that are too far
for the flash to reach. |
|
|
|
| * |
Screen and printed images shown in this web page
are simulations for explanatory purposes only. Actual images
may appear different from those shown here. |
|
|
|
|
|
|
|


![EXILIM PRO [EX-P505]](images/head_cmn2.gif)